Light painting is an excellent way to get creative with night photography. Although there are many techniques, the process is simple. Just set your camera up for a long exposure. Then draw with light.
Some more popular light painting techniques include using a flashlight, sparkler, steel wool, LED lights, or even the lit face of a cell phone or tablet.
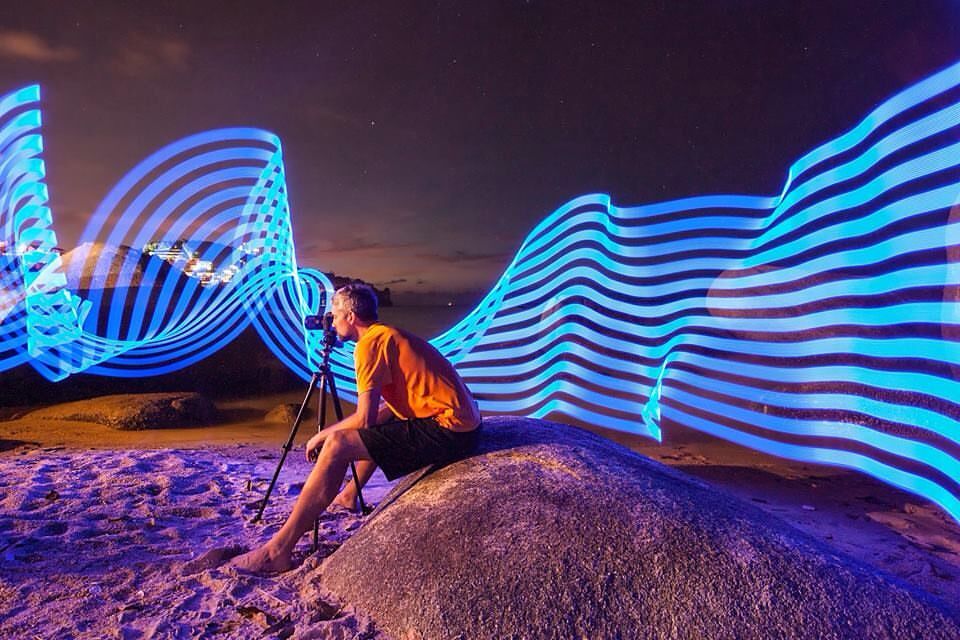
Pixelstick: Magic Trick or Hype?
One of the latest technological trends transforming the world of light painting photography is something called the Pixel Stick by Bit Banger.
In the daylight, it looks like nothing more than a 73″ (187cm) black bar and LED strip and a handle. But by night, it’s a tool that helps photographers create otherworldly images.

Popular Photography calls it, “The most impressive light painting tool we’ve ever seen.”
Wired Magazine says, “A radiant apparatus designed for the Age of Instagram.”
TechCrunch claims, “It will take your long exposure photography to the next level.”
Kickstart Your Creativity
I met up with photographers Simon Bond and Matt Brandon to see what all the noise was about. We started off with with a creative photo session in the daylight, then finished the evening trying out the Pixelstick.
Simon’s 7 Killer Light Painting Tips
1. Choose the darkest location possible. This will make the effect of the light painting stronger. That might mean heading to a beach, or into the forest.
2. Preplan the direction of the light painting, and think about the shapes you wish to create.
3. Keep things simple. The light painting needs to form either a leading line into the frame, or a focus point in the frame. Avoid over cluttering the whole frame with light patterns.

4. Experiment before going out to shoot on location. The Pixelstick has many light pattern presets you can download from the company website. You can also vary the brightness of the stick, and how long the stick fires for.
5. Use varied exposure times. For more complicated patterns, exposing for 10 seconds or longer is needed. If you want to light paint with different setting in the same frame (say two different colours), then I’d suggest at least 20 seconds, perhaps even using bulb.
6. Shorter exposure times also work well. If you’re photographing with a model it’s better to keep to about 1 or 2 seconds, and keep the light painting patterns simple. A simple round circle spin takes around 1 second for instance.

Light Painting Inspiration
Light painting doesn’t start or end with with the Pixelstick. Even simple light sources can produce stunning results.
Photographer Eric Pare leads light painting workshops around the world with nothing more than $3 lamp guards.
What happens when you combine a Pixelstick with traditional light painting, stop motion and hyperlapse to create 3D animations using a ring of 24 Canon 6Ds? It’s called Holopainting and it’s takes things to a whole new level.
And if that’s not enough to have you counting down the hours until the sun sets, have a look at this fascinating light painting compilation.
In the end, it doesn’t matter if you use the light on your phone or a ring of 24 DSLRs to make your light painting images. All that matters is that you get out your camera, create, and embrace the light.
Leave a Reply